Birthdays


{Dad and Mom}


{Opening presents}

This weekend is the best weekend of this year! Its my parents' birthdays. Yes. Parents'. 

It was my Dad's birthday yesterday and my Mom's birthday today. Great coincidence huh? Its really special (and convenient, if I may say so). Moving from one birthday to the next at midnight is the most fun ever. We get to have a cake, both get to cut it together. If we are at dinner on Dad's birthday, we keep celebrating Mom's past midnight. Best excuse to carry on a party even longer! This year its a weekend which is even more special, because we can celebrate the whole weekend, which is exactly what we plan on doing.

And which is why I don't have a Foodie Friday post today. I've been too caught up in the Birthdays and surprises to do much else!

I won't also reveal much else because the Birthday Weekend is still on and my parents read my blog! Wouldn't want to give anything away, now would I? 

*Happy Birthday Mom and Dad! Love you!*

Have a lovely weekend everyone!  


Photo Credits and Copyright: All photos have been taken by Gayatri Kumar and belong to Look who's Wearing (LwW)

LwW Loves: Ikkat Notebook

Photo Credits and Copyright: All photos have been taken by Gayatri Kumar and belong to Look who's Wearing (LwW)

LwW is loving Ikkat, a traditional Indian printing technique. Its mostly found on clothing like Sarees or handloom products like silk and cotton. Its mainly a dyeing technique, sort of like a tie-dye. The difference between them however, is that in a tie-dye process the fabric is woven first and then dyed, while in Ikkat work the threads are bound and dyed first and then woven into the fabric. Ikkat work is very common in India but you will find versions of the Ikkat process in other Asian and some South-American countries as well. 

In India, Ikkat work is mostly a cottage industry, ie, very small scale industries mostly produced and sold by village artisans. 

Ikkat work has been taking the world by storm. You can now find Ikkat prints on bags, cushions and even notebooks. I found this notebook in Fabindia and fell in love at first sight. It has great colors and is a painted impression of an Ikkat print.   

LwW is also loving some other Ikkat stuff:

This Ikkat bag.

Great article about Ikkat work, how its dying out and the need to bring it back to the market.

A lovely Ikkat print dress at Miss Selfridge.

Pink and Orange Ikkat fabric.

Ikkat sofa-chair.

Bright runners (pink and orange) for an Indian-themed wedding (why not?).

Ikkat oxfords by Anthropologie.

Bright ikkat sneaks by Urban Outfitters.


Fitness Regime


{via kikareichert}


Warning: I'm not giving professional advise on a good fitness regimen. I'm talking about my own experience, specifically with swimming and comparing it with any other form of workout. Wow, this sounds surprisingly like one of my essays for college. Don't worry, this should be a lot more fun and definitely much clearer than my papers. If I may digress, isn't the 50's swimsuit in the second picture just amazing? A classic little black swimsuit. Should I try calling it an LBS? Maybe not. 

Right, first things first. Its important to have a fitness regime, and I will say it at the outset, I don't think gym-ing constitutes a good fitness regime. Yes, you're working out, but the results you get from sport are long term and the ones from a gym are short term. Mostly, because your muscles are actually resisting the environment around it to work out. Unlike, say using a treadmill or a stationary cycle. So while the effects of sport will last you for years, the gym only a couple months. 

Which is why I will now come to my sport of choice: swimming. If your workout routine is swimming then these are the things to bear in mind. These are the results of experimenting with my regime for a few months. Note before though: I swim in the mornings (early or late) and I swim laps (2 lengths in a lap).

  1. Eat before you swim (Not immediately before silly).

    Eat a small meal two hours prior to swimming. By 'swimming', I mean you are swimming lengths in the pool and not waddling.

    I tried this out in three different weeks:

    Week 1: Went for a swim without breakfast. Result - no energy, lethargic swimming, got tired quickly, felt tired through the day.

    Week 2: 
    Went for a swim 1 hour after breakfast. Historically speaking, it is said one must swim at least after half an hour of eating, so I decided to make it an hour, just to be on the safe side. Guess what. Cramps and knots in my tummy.

    Week 3: Went for a swim 2 hours after breakfast. Result: A whole lot of energy, I was swimming faster, more lengths, had more stamina and strength, fewer breaks. It also keeps you going for the rest of the day and no cramps!

    Reasoning: It takes the body two hours to digest the food in the stomach. Which is also why you start feeling a little hungry after two hours of eating a meal. Nutritionists will tell you and so will doctors that in order to loose or maintain weight, one must eat 5-6 small meals every two hours in a day.
  2. Warm up before you swim

    They all say it, warm up, warm up, warm up before you exercise! Its extremely important, because you're basically using a warm up to prepare your muscles for the attack - the workout. If you look at boxers, they kinda jump around a little bit before they go in for the punch right? They're prepping themselves to figure out a line of attack. Same way, a warm up or a little stretching is prepping your muscles, or telling them to wake up so that they can be ready to attack your workout. If you start straight away, its like jolting your muscles from a deep sleep and they'll be groggy throughout the workout. You know I'm making sense.
  3. Hydrate

    I keep a plastic cup filled water at the shallow end of the pool. Even though you're in the water at all times, it doesn't mean that you're hydrated. When you start feeling the dryness, sip some water.
  4. Alternative Exercises and Stretching

    If you really want to work your entire body, just the breast-stroke or the freestyle isn't going to help. You need to mix it up a little. There are plenty of water exercises that you can do. Egg beater and cycling (or trying to) in the deep end are excellent additions to your swim. My favorite is the toe touch. Or a version of it.

    Toe Touch: At the deep end face the wall and stay afloat by rotating your arms in the water (as in waddling to keep your head above the water. Try to stand straight in the water (all the while moving your arms!), bring your knees up to your chest and push your toes out to touch the top of the wall. Try to see your feet outside the water. Bring them back in to your chest and push them straight down into the water. Repeat 8-10 times.

    Tip: While pushing your toes down rotate your arms anti-clockwise (towards yourself) and while pushing your toes up rotate them in a clockwise motion (away from yourself). This will help you stay in the same place in the pool.

    Stretching: It is extremely important to stretch, if you want the effects of the workout to last. Stretch any which way you can and whichever way you like, but make sure you stretch your entire body, arms, legs, your sides and your torso, because you use your entire body to swim and do the alternative exercises.
  5. Rest

    Right, so you (1) ate properly, (2) you've warmed up, (3) started swimming and hydrating, (4) did the alternative exercises and stretched and now (5) you need some rest/relaxation.

    This is the best part of my 45 minutes to an hour of swimming. I just let my body go and float on my back as if lying on a water bed. I do that for about 5-10 minutes. It allows the body and your muscles to relax so that they can start the reconstruction process. Yes, your muscles actually break down during your workout and a good rest lets them build themselves up again.

Oh, and don't forget to enjoy yourself! 

Foodie Fridays: Cranberry-Lime Iced Tea

Cranberry-Lime Iced Tea

Great summer quencher and with not too many calories. Tea has great benefits whatever form you take it in and so does lime juice. Add some mint and you've got a healthy iced tea which is a great substitute to colas and doesn't take too long to prep. In fact, you could make a jug and leave it in the fridge for later.

If you have friends over during the day, make a big jug, get different sized glass jars and have yourselves a great iced tea.

For 1 jar of this yum drink you'll need:


  • cranberry juice
  • lemon juice
  • tea bags
  • honey
  • mint leaf ice cubes 
Method:
  • Combine the cranberry juice and lemon juice in a jar, mix well and refrigerate. 
  • Simmer the tea bags in cups of water and let them steep for 4-5 minutes. Over-steeping can make it really bitter and the solution cloudy. Throw out the tea bags, add the honey and let the tea cool down to room temperature. I like to refrigerate the sweet tea for an hour before adding it to the juice mix, but you can add lots of ice and it'll still be great. 
  • Throw in some of the mint leaf ice cubes and pour the sweet tea to the jar and mix well. You get the minty zing as the mint flavoured ice melts in the iced tea. 


Photo Credits and Copyright: All photos have been taken by Gayatri Kumar and belong to Look who's Wearing (LwW)

LwW Loves: Funkanatomy Earrings


LwW loves Funkanatomy's handmade earrings! We got two pairs, the Hot Pink Disco Green and the Peaches and Cream. 

Like the name, Funkanatomy's earrings and their titles are totally honest and funky. You can check out Kirin's collection here and buy them online. They are  extremely affordable and much, much better than all the commercial stuff you get in the markets. You can also check out Kirin's blog here. She's really funny and kinda hyper, which makes me love her so much! There's not a dull moment around Kirin. 


{The funky Funkanatomy box}


{The creator of Funakanatomy.com}


{Peaches and Cream}


{Hot Pink Disco Green}


Photo Credits and Copyright: All photos have been taken by Gayatri Kumar and belong to Look who's Wearing (LwW)

D.I.Y. Daily Planner


I've been disappointed before with different kinds of planners. I'm never able to find a daily planner that would suit my needs. There are thick leather bound diaries with terrible printing and usually available only at the beginning of the calendar year. They're either too big and don't fit in my bag or too small that you cant write anything substantial. 

Last week, I found a DIY post with downloadable daily planner cards. The best thing, to me, about these cards is that you can enter your own date in the boxes given and keep printing them out for as long as you want and not have to start the planner midway leaving so many pages empty. 

Well, that solves the planner pages problem. That was a mouthful. Now, for the planner. If you're alright with a A5 cardboard binder, then you just need to cover it, print the pages and you have your planner! 

Since the A5 binder file was a bit too big for me, I made my own planner! How, you ask? I took an old hardcover book of the size I wanted and ripped out the pages inside to make my planner. 

What you'll need for your planner:

1. Hard cover of a book
2. Daily-planner sheets cut slightly smaller than the size of the book.
3. Your choice of wrapping paper
4. Scissors
5. Binder clips 
6. Glue-stick
7. Ribbon (Color of your choice)

To make your planner:

Pick a hard cover book of the size that you like and slowly but carefully rip out the pages of the book. I used one of the pages to cover and hide the ripped portion inside the cover. Push the folded page down so that it covers the ripped portion and comes up to the edges of the cover. Glue the sides of the folded page to the cover leaving 2 inches at the bottom and the top of the folded page. You'll need that space later when you're covering your folder using wrapping paper.


Place the binder clip in the center of the folded page punch two holes (I just used a pen), through the holes on either side of the binder clip.


Place the binder clip back on top of the holes and draw the ribbon through the holes to tie a knot on the outside.


Tie the knot really tightly so that the binder clip doesn't keep moving, which will create problems when you stick the pages in. Cut off the ends so that the ribbon doesn't extend over to the front and back covers. 
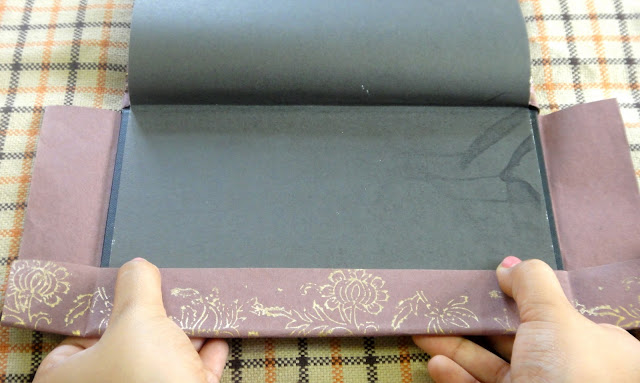
Cut the wrapping paper keeping the hard book cover in the center with at least 2 inches to spare on each side. We left two inches at the top and the bottom to fold in the wrapping paper. Fold each side over the cover to create dents in the paper which will be folded in. Cut along the ends of the folded paper that we stuck on half-way earlier. Once you've folded in the wrapping paper beneath the folder page, stick it on top of the wrapping paper and to secure it in place. Start folding the paper along the dents and stick on using glue-stick. While folding the top and bottom sides, make sure while folding that you leave some space towards the middle of the cover (near the binder clip). If the paper is  stuck on too tightly then it creates waves in the finished product.
Make sure the daily-planner pages have been cut slightly smaller than the cover so that they dont hang out. Punch holes in the pages using a puncher all the while measuring the placement of the binder clip in the cover. Stick them in and you have a daily planner!Enjoy your new planner!Photo Credits and Copyright: All photos have been taken by Gayatri Kumar and belong to Look who's Wearing (LwW)

Foodie Fridays: Elvis's PB&B Snack


This is one of my favourite snacks. Its Elvis Presley's famous 'fried' Peanut Butter sandwich. I'm afraid, however, its my healthier version. Elvis's PB&B ... and B has no jelly, just peanut butter, lots of butter, bacon and banana. I wouldn't recommend Elvis's sandwich fried in bacon fat. Ours, on the other hand will be multigrain bread, peanut butter, banana and olive oil instead of butter.

A great summer cooler to go with the PB&B is a big jar of Cranberry Lime Iced Tea. (Recipe coming next Foodie Fridays!). If you ask some of my friends, they'll tell you how addicted I was to Iced Tea all through high school. I'm not a big coffee fan. Well, except the cold coffee you get at the Delhi High Court Canteen. Its more like a coffee milkshake. Yum. I digress, yet again. 

Peanut Butter and Banana Sandwich


Right. So we will need (for 1 sandwich):
  • 2 slices of multigrain bread
  • Smooth peanut butter
  • 1 ripe banana
  • Your favorite olive oil for cooking
Method:
  • Slice the banana lengthwise in half and then slice the halves lengthwise again.
  • Pour some olive oil in the pan and lightly fry the bananas until golden brown. Slightly cooking the banana gives it a great cooked/pan fried flavour. Cook for not more than 20-30 seconds on each side because its very easy to overcook and burn the banana. 
  • Lightly toast the slices of bread before putting them in the pan. 
  • Spread some of the smooth peanut butter over one slice and the sliced banana on the other slice. Put one slice over the other to make a closed sandwich.
  • Place the sandwich in the pan, turning it over every few minutes until crispy and brown. You can pour some more olive oil if you like. 


Photo Credits and Copyright: All photos have been taken by Gayatri Kumar and belong to Look who's Wearing (LwW)

LwW Loves: Lipsy Sequin Dress

Photo Credits and Copyright: All photos have been taken by Gayatri Kumar and belong to Look who's Wearing (LwW)

LwW is loving this Lipsy sequin dress paired with the Great Plains Red Rose handbag, seen here

Its a great party outfit, and personally I think it goes really well with the red clutch. I love the sweetheart neck, it looks great on everyone and shows just the right amount of skin. 

There's no dressing down this dress. But paired with a light colored (I'm thinking grey) boyfriend blazer with its sleeves rolled up would lighten up the look and make it look a little smarter. What do you think?


Fashion's Night Out 2011: India


I was so excited for 'Fashion's Night Out' the whole of last week. I got there. And it died. The best thing about the Night was the 'Vogue Desire: The Shawl Project' installation. There was some really great work by some of the best Indian designers. I really liked Wendell Rodrick's Ruffle Shawl and Suneet Varma's heavily embroidered border shawl. I apologize for the lack of photos, my camera has been giving me some trouble and ran out of battery at the event. 

However, as many others may vouch, there was nothing really worth taking account of. The queues for 'Vogue Steals' and 'Vogue Loves' were ridiculously long. It would have been much more successful and fulfilling if they had managed the queues and the pop up stores well. The 'crew' were not very well informed. It took a bit of asking around to figure out where the media registration desk was. They were out of everything, including most FNO t-shirts within the first half hour and re-stocked only at 9:30 pm, three and a half hours after the event started and three hours after they ran out.

It feels as though it wasn't very well thought out. I would suggest (unsolicitedly):

  • Better signs 
  • Spreading the pop up shops so that there isn't just one extremely long queue and pushing/shoving. 
  • making the event more compact and bringing the pop-ups together at one place in the Mall (the rest of the Mall would still have footfall as people would walk around anyway) 
  • to increase footfall, have better signages all over the place (I would add arrows) telling people what's happening where. Otherwise, people walk around and ignore what's going on in independent stores and miss out on what was painstakingly set up by shop-owners to thrive business. Advertise, advertise, advertise! 

We did end up in Kitsch at one point and were very happy with their collection (especially the Moschino ballet flats and the Dianne Von Furstenberg clutches), their attention and their cupcakes. Thanks Kitsch! I also thought the Stella McCartney FNO badges were really cute! 

Another day at another Mall in the city. But a really fun excuse to dress up!


Photo Credits and Copyright: All photos have been taken by Gayatri Kumar and belong to Look who's Wearing (LwW)

Foodie Fridays: Cranberry Toddy and Cookies

Its raining, its pouring and I'm done with Hot Sams and Chai. Typically, during the monsoons one finds themselves craving something yum and hot, even though its not cold but just raining.

And since its been raining constantly, we've done the samosas, the dhoklas and salty tid bits (namak pare) accompanied by Chai, that is, tea, not chai tea. I find the term 'chai tea' quite redundant actually. It literally means 'tea tea' in English, which loses chai its purpose and meaning. I digress.

So, I made some cranberry based Toddy and Nutella cookies. I'd love to say I was feeling adventurous about making toddy with cranberry juice. We were out of apple juice.


Cranberry Toddy

1 part Pimms
3 parts Cranberry juice
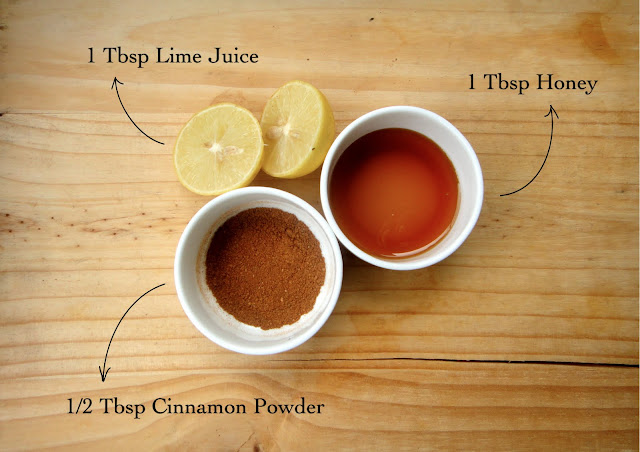
1 Tbsp Honey
1/2 Tbsp Cinnamon powder
2 Tbsp Lemon juice

Method:
  • Heat the cranberry juice in saucepan over low heat.
  • Add the honey, cinnamon powder and lemon juice and stir slowly
  • Let the juice mixture begin to simmer and add the Pimms. 
  • Let the mixture slightly simmer and take the pan off the heat. Let it sit for 1 minute.  
Tip: Keep tasting the simmering mix in case you'd like more cinnamon or lemon juice. 

Keep reading for the Nutella cookie recipe!


Nutella Cookies

130 g All-purpose flour
150 g Nutella 
100 g Sugar
1 egg

Method:
  • Mix the dry ingredients then pour in the nutella and the egg.
  • Mix and then knead the cookie dough
  • Make 1 inch balls and flatten them on the cookie sheet. And just pop 'em in the oven.  
  • Bake for 7-8 minutes at 180 C (350 F) 

Photo Credits and Copyright: All photos have been taken by Gayatri Kumar and belong to Look who's Wearing (LwW)
Related Posts Plugin for WordPress, Blogger...
Real Time Web Analytics